How to ride the barrel at Bingin
If you cannot get barrelled at Bingin, the saying goes, you cannot get barrelled anywhere. Known as the perfect wave machine, Bingin offers one of the most consistent, mechanical left-hand tubes on the planet — and unlike the intimidating power of Padang Padang Lefts, it is accessible to advanced and confident intermediate surfers.
That accessibility comes with a caveat. Bingin is short, intense and breaks over a shallow reef. It is a technical wave that demands you take off in exactly the right position — too deep and you hit the reef, too wide and you miss the wave entirely. Get the positioning right and the barrel is one of the most achievable on the Bukit Peninsula. Get it wrong and you will spend the session watching other surfers disappear into perfect tubes while you scratch at the shoulder. This guide covers everything you need to know.
Positioning at Bingin: Finding the Sweet Spot
The Bingin peak is a little shifty. Set waves come in fast out of deep water and the bigger sets break wide. The most common mistake is sitting too wide on the shoulder — you either miss the wave entirely or take off too deep and fail to make the first section. Too deep is also dangerous: the reef comes up quickly and the wave becomes very steep and sucky. Take off deep at low tide and you are heading toward shallow reef with very little margin.
The sweet spot is around two metres from the peak. The current at Bingin runs consistently, sweeping you wide — paddle actively back toward the big rock on the inside to stay in position. This gives you the easiest entry point while keeping you in the pocket for the barrel section. Watch where the local surfers sit, follow their movements, and do not be afraid to paddle hard for position.
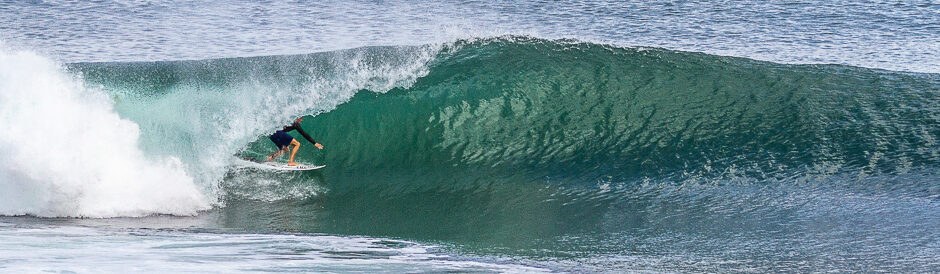
The Angled Take-Off at Bingin: Why Going Straight Will Cost You the Barrel
The angled take-off is the most critical technical skill at Bingin, particularly at low to mid tide. As the swell hits the reef, the bottom of the wave slows down while the lip throws forward — creating a steep, near-vertical wall almost instantly. As our Science of Waves guide explains, this is bathymetry at work: the abrupt deep-to-shallow transition at Bingin’s reef causes the bottom of the wave to slow dramatically while the top keeps moving, pitching the barrel.
Do not take off straight. If you try to bottom turn from a straight drop at low tide you will lose your line or get caught behind the lip before you have even begun. By angling your take-off, you set your rail immediately — which sets you up directly for the barrel section that follows. Paddle very hard, keep your head up and look toward where you want to go rather than down at the wave face. Commit fully. Hesitation at Bingin is always punished.
How to Stall for the Barrel at Bingin
The easy barrel at Bingin is not found by taking off deep — it is found by taking off in the optimal position and then stalling correctly for the tube. There are two techniques, both effective, and both covered in detail in our barrel riding coaching sessions.
The arm drag is the simpler of the two. Immediately after you pop up, bend your inside elbow and drag your arm through the face of the wave. This slows you down and keeps you tightly positioned in the pocket beneath the lip. Hold it there until the lip pitches over you, then exit cleanly. This technique works particularly well at Bingin — you can see it in action in our YouTube barrel riding tips video, which includes footage shot specifically at this break.
The bottom turn and stall requires slightly better timing. After the take-off, drive a bottom turn and then press heavily onto your back foot to reduce speed. Hold the wave face with your inside arm to maintain your position in the pocket and keep your speed low. The combination of back foot pressure and arm hold keeps you locked under the lip as it throws over you.
For goofy-footers, Bingin is a frontside barrel and both techniques come naturally. For regular-footers surfing backhand, you will want to pig dog — holding the outside rail with your right hand. Backhand barrel riding requires heel-side control, which has less natural range of movement than toe-side, so the pig dog position compensates by giving you direct rail control and keeping you compact in the tube.
Escaping Greedies: Bingin’s Most Dangerous Section
The worst injuries at Bingin come from trying to extend the ride too long. The end section of the reef is known locally as Greedies — named after surfers who stay on the wave when they should have kicked out. It breaks hard on dry rock and even visiting professionals have regretted attempting a floater or lip hit there.
The rule is straightforward: get your barrel, make one top turn if the wave offers it, and kick out cleanly before Greedies. If you find yourself in the Greedies section, stay low and push through the bottom of the wave — do not try to jump over it or ride through the top. For goofy-footers it is slightly easier to bend low and push from the board due to your frontside position.
Bingin’s great advantage — the reason it is called the easiest barrel in the world — is that it never closes out before Greedies. There is always a safe exit before the section becomes dangerous. The wave breaks slowly and predictably by barrel standards, and the exit is always there if you commit to it at the right moment rather than pushing for one more section.
The Best Conditions for Barrelling at Bingin
Bingin breaks on all tides, but conditions vary significantly.
Mid tide is the sweet spot — hollow enough to barrel consistently, with enough water over the reef to make mistakes survivable. This is when you will find the most surfers in the water and the strongest pecking order.
Low tide produces the most hollow and intense barrels, but the reef is dangerously shallow and the take-off window is very narrow. Experienced surfers only, and only those who know the break well.
High tide produces longer rides but needs a very big swell to barrel. The current strengthens considerably and catching the wave requires more effort.
Swell size: Head-high to head and a half is the ideal range. Any bigger and the wave tends to get fat and loses its tubular shape. Any smaller and the wait between sets becomes long — on small days the never-flat reef at Uluwatu will offer more consistent options further along the coast.
Score the Barrel of Your Life at Bingin with Expert Coaching
Bingin is less than 1km from our camp and our guides surf it daily. We run dedicated barrel riding coaching sessions at Bingin using video analysis to show you exactly where your positioning, take-off angle or stall technique is breaking down — and how to fix it. Seeing your own surfing on screen is the fastest way to understand what the lip is doing while you are inside it.
Ready to get barrelled? Book a barrel riding coaching session with us and let us put you in the right spot at the right tide — every session.